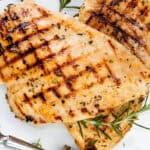
Grilled Chicken Breasts
This char-grilled chicken breast is juicy, tender, and perfectly smoky with a light garlicky brine and golden grill marks that seal in flavor. Simple, bold, and summer BBQ-ready!
Servings 4
Calories 376
Ingredients
For the Brine:
- 4 cups water
- ¼ cup kosher salt
- ¼ cup sugar or brown sugar
- 1 teaspoon baking soda
- 2 garlic cloves smashed
- 1 tablespoon peppercorns
- 2 bay leaves
For the Chicken:
- 4 chicken breasts boneless & skinless
- 2 tablespoons light olive oil
- Salt and pepper to taste
Instructions
Prepare the Brine:
- First, in a large bowl, mix the water, kosher salt, sugar, baking soda, garlic cloves, peppercorns, and bay leaves. Stir until the salt and sugar are completely dissolved. This mixture is your brine.
Brine the Chicken:
- Place the chicken breasts in the brine, making sure they are completely submerged. Cover the bowl and refrigerate for at least 1 hour, but not more than 6 hours. Brining for too long can make the chicken too salty.
Preheat Your Grill:
- While the chicken is brining, prepare your grill. You want it hot for char-grilling, so aim for a temperature around 400-450°F (204-232°C). If you're using a charcoal grill, make sure the coals are white-hot and spread evenly.
Prepare the Chicken:
- After brining, remove the chicken breasts from the brine and pat them dry with paper towels. Discard the brine. Coat the chicken lightly with olive oil and season with salt and pepper. If you're using additional herbs or spices, now is the time to add them.
Grill the Chicken:
- Place the chicken breasts on the grill. Cook for about 6-7 minutes on each side, or until the internal temperature reaches 165°F (74°C). The high heat will give the chicken a nice char on the outside while keeping it moist on the inside.
Rest and Serve:
- Once cooked, let the chicken rest for a few minutes before slicing. This allows the juices to redistribute, making sure your chicken is moist and flavorful.
Notes
Erren’s TopTips
Whether you’re new to the grill or just looking to level up your chicken game, these pro tips will help you get that juicy, smoky perfection every single time: Brine Timing Matters Stick to 1–6 hours of brine time. More than that and your chicken might taste overly salty and a little rubbery. Set a timer so you don’t forget! Pat Dry = Better Sear Don’t skip this step! Patting the chicken dry after brining helps it sear beautifully on the grill instead of steaming. Dry chicken = better browning. Use a Meat Thermometer If you’re not already using one, get yourself a digital meat thermometer. Aim for 165°F in the thickest part — it’s the key to juicy, safe chicken. Flip Just Once Avoid flipping the chicken over and over. Let it cook undisturbed on one side for 6–7 minutes, then flip once. This gives you gorgeous grill marks and locks in the juices. Rest Before Slicing It’s tempting to dive right in, but give the chicken 5 minutes to rest. That pause keeps the juices from running all over your cutting board — they stay inside, where they belong. Don’t Re-Season Too Soon If you’re adding dry spices after brining, wait until after you’ve dried the chicken. Wet chicken + spices = weird texture and uneven coverage.Storage & Freezing Instructions
Keep that juicy grilled chicken fresh with these easy storage tips: Fridge Storage Let the chicken cool completely, then store it in an airtight container in the fridge. It’ll stay fresh and tasty for up to 4 days. It’s perfect for salads, wraps, or sandwiches all week. Freezing Instructions Wrap each cooled chicken breast tightly in plastic wrap or foil, then store in a freezer-safe bag or container. Freeze for up to 2 months.Pro Tip: Slice before freezing if you plan to use it in grain bowls or tacos — it thaws way faster! Reheating Tips To keep it from drying out, reheat gently. Try the microwave at 50% power with a splash of broth or water, or warm in a skillet on low heat, covered, until heated through.
Nutrition
Calories: 376 | Carbohydrates: 15g | Protein: 48g | Fat: 13g | Saturated Fat: 2g | Polyunsaturated Fat: 2g | Monounsaturated Fat: 7g | Trans Fat: 0.03g | Cholesterol: 145mg | Sodium: 7622mg | Potassium: 877mg | Fiber: 1g | Sugar: 13g | Vitamin A: 85IU | Vitamin C: 3mg | Calcium: 37mg | Iron: 1mg